I knew the birthday boy liked wooden blocks. My search for helicopter wood blocks directed me to a shop on Etsy. This shop made a transportation themed wood block set, so I thought, maybe the shop will make a customized wood block set with different helicopter designs. To my disappointment, the shop said "No." Well fine, I don't want your stupid blocks.
I pouted, surely those blocks would be a great, unique gift. Then I remembered the dremel tool we keep in our garage, and I knew it had an engraving set with it. My plan was to create my own custom wood blocks for the birthday boy. Well, I needed wood blocks, so I bought those stupid wood blocks from the Etsy shop, which fortunately does sell blank wood blocks. These blocks are organic with no preservatives, so it meant baby mouth safe. Yay!
The blocks arrived...so I needed to get to work. First step, I needed to design what I would engrave. I knew I needed to plan for the joints because the harder engraving needed to be on the solid block and not where it transitions to another block.
After measuring the blocks and drawing them on Engineering paper, I was ready to begin the helicopter design.
When I finished the basic design, I realized I needed to transfer the design to the blocks. It's easier to erase on paper than on wood blocks...I had sticker printer paper leftover from last Christmas's crafty adventure, that I made a copy of the helicopter onto this paper, cut it out, and laid it on the blocks.
The next step was using the dremel tool to cut the outline and intial engraving. Fine tuning the engraving would come next. Part of the process was learning what speed to set the dremel on and whether to use the larger engraving piece or the smaller one. I also experimented with using a sander to help even out the larger areas, such as the helicopter blades, but the sander left marks on the blocks that I didn't like.
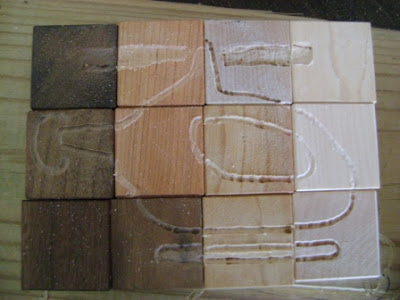
I also learned that different wood types reacted to the dremel engraver differently, sometimes a real pain. The pine (right hand blocks) were not cool with changes in direction, so curves were difficult, and the engraver jumped outside of the lines. The darker woods were more difficult to break the surface, but easier to make more intricate designs. Curves were no problem, and you can hold the engraver in place to create a dark spot, so it allows more creativity.
Finally to accent the engraving, I used a wood block conditioning oil and a Q-tip to "stain" the outline. Wood block conditioner is food grade safe, so it's also baby mouth safe, and it adds a nice touch to the finish product.
Here's a view of the other sides, well, except one. No idea how I forgot to photograph the final side.
The receiver loved the gift, which warmed my heart immensely. I am so glad the Etsy shop refused to create a custom block set because it allowed me to create a more personal block set.


You are so thoughtful and generous! I love it!
ReplyDelete